프로젝트 개요
원티드 백엔드 인턴십을 통해 기업 과제를 수행하면서, 자원서버와 인증서버를 별도로 두고 사용하는 구조가 있다는 것을 알게 되었다.
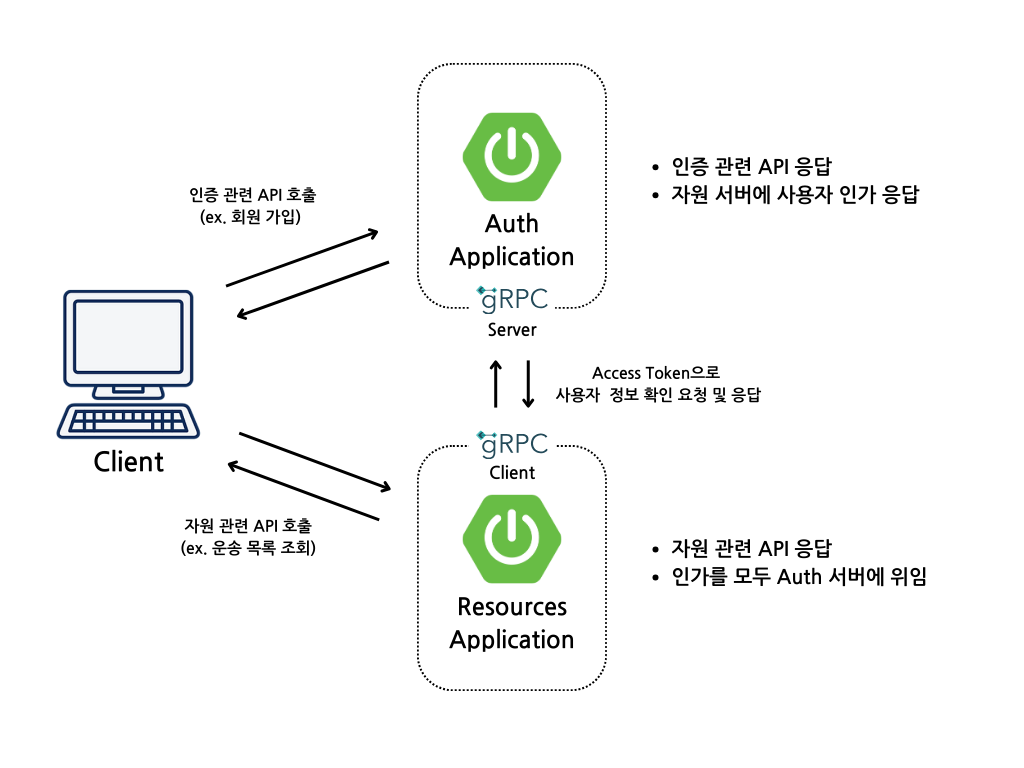
이때 특이했던 점은 자원서버는 자원에 대한 CRUD API만으로 구성되어 있으면서 모든 API에 대한 인가 처리는 인증 서버로 통신해서 처리하도록 만들어야 한다는 점이었다. 구성도는 아래와 같다.
자원 서버와 인증 서버 간의 통신을 gRPC로 구현해야 했는데, 먼저 gRPC란 무엇인지에 대한 이해가 필요했다.
gRPC란?
Google에서 개발한 오픈소스 원격 프로시저 호출(Remote Procedure Call, RPC) 프레임워크. 마이크로서비스 간 통신을 위해 설계되었으며, 빠르고 효율적인 데이터 전송을 지원한다. gRPC는 기본적으로 HTTP/2 프로토콜을 사용하고, 데이터 전송 포맷으로는 Protocol Buffers(프로토콜 버퍼)를 채택하여 성능이 뛰어나고 효율적인 통신이 가능하다.
gRPC 사용법
Github과 Document를 참고하여 사용해 보자. 특히 Github에는 Examples 폴더 하위에 다양항 경우에서 gRPC 서버와 클라이언트를 사용하는 경우의 예시 코드가 작성되어 있다.
정리해본 사용 방법 및 순서는 아래와 같다. 대략적인 순서를 확인하고, 아래 시나리오에 따라서 구현해 보았다.
- 프로토콜 버퍼(proto) 파일 작성
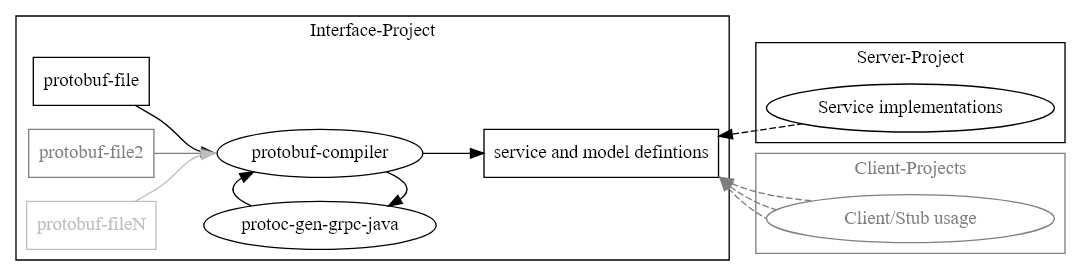
- 위 이미지에서 protobuf-file을 통해 Interface-Project를 정의하는 단계이다.
- 먼저
.proto파일을 만들어 서비스 정의 및 데이터 메시지를 정의한다.
- 프로토콜 파일을 컴파일하여 코드 생성
.proto파일을 컴파일하면 언어별 gRPC 코드를 자동으로 생성한다.- 해당 서비스를 사용하는 서버/클라이언트 모두에서 공통적으로 사용된다.(이미지 우측에서 Server-Project와 Client-Proejcts)가 공통으로 의존하고 있는 것을 알 수 있다.)
- 서버 구현
- 클라이언트에서 요청받은 내용을 처리하기 위한 로직을 정의한다.
- 클라이언트 구현
- 서버로 데이터를 요청하고 응답받은 내용으로 서비스 로직을 구현한다.
- 서버-클라이언트 순차적 실행
- gRPC 서버를 먼저 실행한 뒤 클라이언트를 실행하여 준비한다.
시나리오
- SpringBoot 인증 서버, 자원 서버가 각 포트에서 동작한다.
- 인증 서버와 자원 서버는 동시에 gRPC 서버(포트 동작)와 gRPC 클라이언트로서 동작한다.
- 클라이언트는 사용자 회원가입/로그인/로그아웃/토큰 재발급 등 인증과 관련된 API를 Auth Server로 호출한다.
- 클라이언트는 Auth Server에서 발급한 Access Token으로 자원에 대한 CRUD API를 Resources Server로 호출한다.
- Resources Server는 Access Token 검증을 위해 Auth Server에 사용자 검증을 요청한다.
- Auth Server는 요청받은 Access Token으로 검증 작업을 수행하고 결과를 응답한다.
- Resources Server는 Auth Server로부터 받은 응답으로 검증되지 않은 Access Token에 대해서는 응답을 거부한다.
- Auth Server와 Resources Server는 gRPC 프로토콜로 통신한다.
기술 스택
Java 17SpringBoot 3.2.8grpc-server-spring-boot-starter:3.1.0.RELEASEgrpc-client-spring-boot-starter:3.1.0.RELEASE
gRPC + SpringBoot3 구현 시작
0. 들어가기 전에 - gRPC 인터페이스 설정(.proto 파일)은 어떻게 해야 할까
위 gRPC 사용법 섹션에서 .proto 파일을 작성하고 컴파일하면 Java 코드가 생성되고 Server와 Client에서 사용할 수 있다는 것을 알 수 있다.
문제는 ‘이 프로젝트를 어떻게 공통적으로 관리하는가’인데, 크게 아래와 같은 방법이 있는 것 같다.
.jar파일로 만들고 필요한 프로젝트에서 import 하여 사용- 패키지로 만들고 로컬 메이븐 레포지토리에 업로드 후 의존성 추가하여 사용
- 사용하는 서버/클라이언트에 동일한 .proto 파일을 작성하여 사용
.proto 파일의 작성이 익숙하지 않아 계속해서 수정될 것이라 생각했기에, 일단 3번 방식을 택해 서버에서 .proto 파일을 작성하고 테스트한 뒤, 클라이언트에서도 문제가 없는 .proto파일을 수정해 나갔다.
1. .proto 파일 생성 (gRPC 서버, 클라이언트 공통 사용)
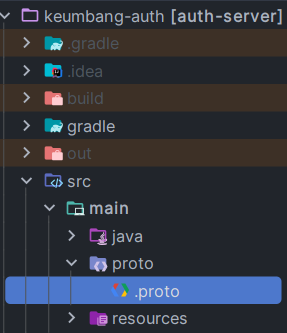
- 두 Spring Boot 서버의 /src/main/proto 경로 하위에 .proto 파일을 생성한다.
- 주의 ! gRPC 서버와 클라이언트 양 프로젝트 모두 동일한 .proto 파일을 참조해야 한다.
- gradle 설정(의존성, 플러그인 등) 또한 동일한 부분이 존재하며, 서버와 클라이언트 각 세션에서 자세히 살펴보자.
syntax = "proto3";

package auth;

// Java 옵션 설정
option java_multiple_files = true;
option java_package = "com.keumbang.api.auth_server.grpc";  // Java 패키지 경로 설정
option java_outer_classname = "AuthServiceProto";           // 외부 클래스 이름 설정

// gRPC 서비스 정의
service AuthService {
  // Access Token 검증을 위한 RPC 메서드
  rpc ValidateToken (ValidateTokenRequest) returns (ValidateTokenResponse);
}

// 요청 메시지 정의
message ValidateTokenRequest {
  string accessToken = 1;  // Access Token 필드
}

// 응답 메시지 정의
message ValidateTokenResponse {
  bool isValid = 1;         // 토큰의 유효성 여부
  int64 userId = 2;         // 사용자 ID
  string account = 3;       // 사용자 계정
  string errorCode = 4;     // 에러 코드
  string message = 5;       // 응답 메시지
}
통신에 사용할 서비스, 요청-응답 메시지를 미리 정의해 둔 것을 알 수 있다.
2. Spring Boot 인증 서버 구현
.proto 파일을 정의했으니, gRPC server 역할을 할 인증 서버를 구현해 보자.
2-1. 의존성 설정 (Gradle, gRPC server)
사용한 build.gradle 설정을 그대로 가져왔으며, 본인의 코드에 gRPC 부분을 추가해서 사용할 수 있다.
buildscript,plugins,dependencies,protobuf&ideaplugin 설정이 필요하다.
buildscript {
    // Protocol Buffers (protobuf) 및 gRPC 관련 버전 정의
    ext {
        protobufVersion = '3.23.4'
        protobufPluginVersion = '0.8.18'
        grpcVersion = '1.58.0'
    }
}

plugins {
    id 'java'
    id 'org.springframework.boot' version '3.2.8'
    id 'io.spring.dependency-management' version '1.1.6'

    // proto 관련 plugin 설정
    id 'com.google.protobuf' version "${protobufPluginVersion}"
    id 'idea'
}

group = 'org.example.grpc'
version = '0.0.1-SNAPSHOT'

java {
    toolchain {
        languageVersion = JavaLanguageVersion.of(17)
    }
}

repositories {
    mavenCentral()
}

dependencies {
        // 기본적으로 필요한 의존성 추가
    implementation 'org.springframework.boot:spring-boot-starter-data-jpa'
    implementation 'org.springframework.boot:spring-boot-starter-security'
    implementation 'org.springframework.boot:spring-boot-starter-web'
    implementation 'org.springdoc:springdoc-openapi-starter-webmvc-ui:2.6.0'
    implementation 'org.springframework.boot:spring-boot-starter-validation'
    implementation 'org.mariadb.jdbc:mariadb-java-client:3.3.3'
    implementation "me.paulschwarz:spring-dotenv:4.0.0"
    // JWT
    implementation 'io.jsonwebtoken:jjwt-api:0.12.6'
    implementation 'io.jsonwebtoken:jjwt-impl:0.12.6'
    implementation 'io.jsonwebtoken:jjwt-jackson:0.12.6'

    compileOnly 'org.projectlombok:lombok'
    developmentOnly 'org.springframework.boot:spring-boot-devtools'
    annotationProcessor 'org.projectlombok:lombok'

    testImplementation 'org.springframework.boot:spring-boot-starter-test'
    testImplementation 'org.springframework.security:spring-security-test'
    testRuntimeOnly 'org.junit.platform:junit-platform-launcher'

    // gRPC - server
    implementation 'net.devh:grpc-server-spring-boot-starter:3.1.0.RELEASE'
    if (JavaVersion.current().isJava9Compatible()) {
        // Java 9+ 호환성을 위한 javax.annotation.Generated 해결 방법
        // 참조: https://github.com/grpc/grpc-java/issues/3633
        compileOnly 'org.apache.tomcat:annotations-api:6.0.53'
        annotationProcessor "jakarta.annotation:jakarta.annotation-api"
    }
}

// Protocol Buffers (protobuf) 플러그인 설정
protobuf {
    protoc {
        artifact = "com.google.protobuf:protoc:${protobufVersion}"
    }
    generatedFilesBaseDir = "$projectDir/build/generated"
    plugins {
        grpc {
            artifact = "io.grpc:protoc-gen-grpc-java:${grpcVersion}"
        }
    }
    generateProtoTasks {
        all()*.plugins {
            grpc {}
        }
    }
}

idea {
    module {
        // IntelliJ IDEA에서 소스 디렉토리로 인식할 경로 설정
        sourceDirs += file('build/generated/main/java')
        sourceDirs += file('build/generated/main/grpc')
        generatedSourceDirs += file('build/generated/main/java')
        generatedSourceDirs += file('build/generated/main/grpc')
    }
}

tasks.named('test') {
    useJUnitPlatform()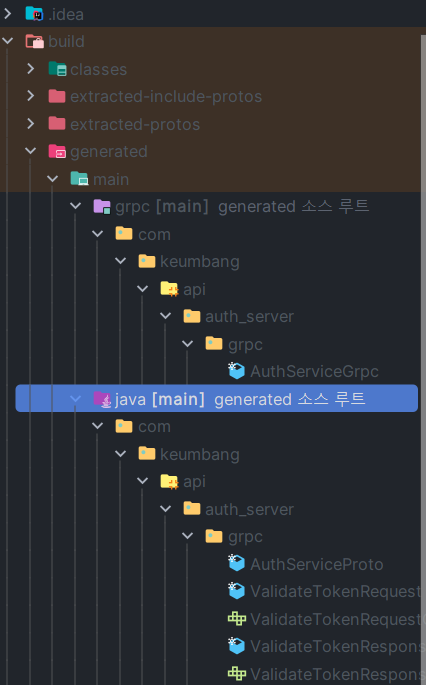
}- 의존성 설정을 한 뒤 gradle 패키지 clean - compile을 진행하면 아래와 같이 Java로 gRPC 인터페이스가 생성된다.
2-2. 회원가입, 로그인 REST API 구현 (필요한 서비스 로직 구현)
아래 요구사항에 따라 gRPC 요청에 사용될 API를 미리 구현했다.
- 사용자는 id와 pw만으로 가입한다.
- JWT를 사용할 예정으로, 관련 로직(JWT 생성, 검증 등)은 미리 작성해두어야 한다.
- 로그인 성공 시 Refresh Token과 Access Token을 응답한다. 이때, 응답 형식은 상관없으며 필자는 Authorization Header에 Access Token을, ‘refresh’ Cookie에 Refresh Token을 설정해서 응답했다.
    /**
     * 사용자 회원가입
     *
     * @param signUpRequestDto 회원가입 요청 DTO
     * @return 사용자 Id
     * @throws CustomException 계정명 중복 -> ACCOUNT_ALREADY_REGISTERED
     */
    @Operation(summary = "사용자 회원가입", description = "사용자는 계정과 비밀번호로 회원 가입합니다.")
    @ApiResponse(
            responseCode = "200"
            , description = "회원가입 성공"
            , content = @Content(mediaType = "application/json", schema = @Schema(implementation = CommonResponse.class))
    )
    @PostMapping("/signup")
    public ResponseEntity<CommonResponse<Long>> signUp(@RequestBody @Valid SignUpRequestDto signUpRequestDto) {
        CommonResponse<Long> response = CommonResponse.ok("회원가입에 성공했습니다.", authService.signUp(signUpRequestDto));

        return new ResponseEntity<>(response, response.getHttpStatus());
    }

    /**
     * 사용자 로그인
     *
     * @param loginRequestDto 로그인 요청 DTO
     * @return Access Token과 Refresh Token
     * @throws CustomException 인증 실패 -> USER_NOT_FOUND, PASSWORD_NOT_MATCHED
     */
    @Operation(summary = "사용자 로그인", description = "사용자는 계정과 비밀번호로 로그인합니다.")
    @ApiResponse(
            responseCode = "200"
            , description = "로그인 성공"
            , content = @Content(mediaType = "application/json", schema = @Schema(implementation = CommonResponse.class))
    )
    @PostMapping("/login")
    public ResponseEntity<CommonResponse<?>> login(@RequestBody @Valid LoginRequestDto loginRequestDto, HttpServletResponse response) {
        authService.login(loginRequestDto, response);
        return new ResponseEntity<>(CommonResponse.ok("로그인에 성공하였습니다."), HttpStatus.OK);
    }
2-3. gRPC 설정 (서버)
gRPC 서버로 사용되기 위한 설정을 추가적으로 해준다. 이전에 .proto 파일에서 미리 정의해 두었던 서비스 인터페이스를 실제로 구현하고, SpringSecurity 사용 중이라면 관련 설정과 application.yml 설정, 추가적으로 로깅을 위한 인터셉터를 구현해 주었다.
1) gRPC 서비스 파일 추가
- .proto 파일에서 정의한 서비스를 실제로 구현하는 클래스이다.
- .proto 파일 컴파일을 통해 생성된 AuthServiceGrpc 클래스를 상속받는 것을 알 수 있다.
- 구체적으로 구현하고 싶은 서비스 로직을 작성한다.
- .proto 파일에서 정의한 요청 메시지를 받아 Access Token을 검사한 뒤, 성공/예외에 따른 응답을 반환한다. 응답 메시지 또한 .proto 파일에서 정의한 내용을 따른다.
@RequiredArgsConstructor
@GrpcService
public class AuthServiceImpl extends AuthServiceGrpc.AuthServiceImplBase {

    private final TokenService tokenService;
    private final String SUCCESS_MESSAGE = "Authentication success";

    @Override
    public void validateToken(ValidateTokenRequest request, StreamObserver<ValidateTokenResponse> responseObserver) {
        String accessToken = request.getAccessToken();

        try {
            sendSuccessResponse(responseObserver, tokenService.validateAccessToken(accessToken));
        } catch (JwtAuthenticationException e) {    // JWT 관련 예외 처리
            sendErrorResponse(responseObserver, e.getErrorCode());
        } catch (Exception e) {                     // 기타 예외 처리
            sendErrorResponse(responseObserver, ErrorCode.INTERNAL_SERVER_ERROR);
        }
    }

    private void sendSuccessResponse(StreamObserver<ValidateTokenResponse> responseObserver, User user) {
        ValidateTokenResponse response = ValidateTokenResponse.newBuilder()
                .setIsValid(true)
                .setUserId(user.getId())
                .setAccount(user.getAccount())
                .setMessage(SUCCESS_MESSAGE)
                .build();
        responseObserver.onNext(response);
        responseObserver.onCompleted();
    }

    private void sendErrorResponse(StreamObserver<ValidateTokenResponse> responseObserver, ErrorCode errorCode) {
        ValidateTokenResponse response = ValidateTokenResponse.newBuilder()
                .setIsValid(false)
                .setErrorCode(errorCode.name())
                .setMessage(errorCode.getMessage())
                .build();
        responseObserver.onNext(response);
        responseObserver.onCompleted();
    }
}
2) SecurityConfig Class Bean 추가
- gRPC 통신과 Spring Security 통합 설정을 위한 코드를 추가해 준다.
@Bean
public GrpcAuthenticationReader authenticationReader() { // 지원하는 인증 유형을 구성
	return new BasicGrpcAuthenticationReader();

    // final List<GrpcAuthenticationReader> readers = new ArrayList<>(); // readers.add(new BasicGrpcAuthenticationReader());
    // readers.add(new SSLContextGrpcAuthenticationReader());
    // return new CompositeGrpcAuthenticationReader(readers);
}
3) Application.yml 포트 설정 추가
grpc:
    server:
        port: 50051 // 임의의 포트 추가
4) (옵션) Interceptor를 사용한 로깅을 위한 Config 파일 및 Interceptor 추가
통신 시 별도로 로그가 남지 않아 gPRC에서 제공하는 ServerInterceptor 인터페이스를 통해 LoggingInterceptor를 만들었다.
@Configuration
public class GrpcConfig {
    @Bean
    @GrpcGlobalServerInterceptor
    public ServerInterceptor loggingInterceptor() {
    	return new LoggingInterceptor(); // 작성한 LoggingInterceptor를 사용
    }
}
@Slf4j
public class LoggingInterceptor implements ServerInterceptor {
@Override
public <ReqT, RespT> ServerCall.Listener<ReqT> interceptCall(
ServerCall<ReqT, RespT> call,
Metadata headers,
ServerCallHandler<ReqT, RespT> next) {
// 요청 로깅
logMessage("Call received", call.getMethodDescriptor().getFullMethodName());
logMessage("Headers", headers.toString());
// 원래 호출 계속 진행
ServerCall.Listener<ReqT> listener = next.startCall(call, headers);
// 응답 로깅
return new ForwardingServerCallListener.SimpleForwardingServerCallListener<ReqT>(listener) {
@Override
public void onComplete() {
logMessage("Call completed", call.getMethodDescriptor().getFullMethodName());
super.onComplete();
}
@Override
public void onCancel() {
logMessage("Call cancelled", call.getMethodDescriptor().getFullMethodName());
super.onCancel();
}
@Override
public void onMessage(ReqT message) {
logMessage("Received message", message.toString());
super.onMessage(message);
}
};
}
private void logMessage(String title, String message) {
log.info("{} [{}]", title, message);
}
}3. Spring Boot 자원 서버 구현
gRPC server 역할을 하는 인증 서버를 구현했으니, 이제 client 역할을 하는 자원 서버를 구현해 보자.
3-1. 의존성 설정(Gradle, gRPC client)
gRPC 서버 설정과 비슷하고, 의존성 부분만 client로 다르다.
buildscript {
    // Protocol Buffers (protobuf) 및 gRPC 관련 버전 정의
    ext {
        protobufVersion = '3.23.4'
        protobufPluginVersion = '0.8.18'
        grpcVersion = '1.58.0'
    }
}

plugins {
    id 'java'
    id 'org.springframework.boot' version '3.2.8'
    id 'io.spring.dependency-management' version '1.1.6'
    id 'com.google.protobuf' version "${protobufPluginVersion}"
    id 'idea'
}

group = 'com.example.grpc'
version = '0.0.1-SNAPSHOT'

java {
    toolchain {
        languageVersion = JavaLanguageVersion.of(17)
    }
}

repositories {
    mavenCentral()
}

dependencies {
    // 기본적으로 필요한 의존성 추가
    implementation 'org.springframework.boot:spring-boot-starter-data-jpa'
    implementation 'org.springframework.boot:spring-boot-starter-security'
    implementation 'org.springframework.boot:spring-boot-starter-web'
    implementation 'org.springdoc:springdoc-openapi-starter-webmvc-ui:2.6.0'
    implementation 'org.springframework.boot:spring-boot-starter-validation'
    implementation 'org.mariadb.jdbc:mariadb-java-client:3.3.
    implementation "me.paulschwarz:spring-dotenv:4.0.0"

    compileOnly 'org.projectlombok:lombok'
    developmentOnly 'org.springframework.boot:spring-boot-devtools'
    annotationProcessor 'org.projectlombok:lombok'

    testImplementation 'org.springframework.boot:spring-boot-starter-test'
    testImplementation 'org.springframework.security:spring-security-test'
    testRuntimeOnly 'org.junit.platform:junit-platform-launcher'

    // gRPC - client
    implementation 'net.devh:grpc-client-spring-boot-starter:3.1.0.RELEASE'
    if (JavaVersion.current().isJava9Compatible()) {
        // Java 9+ 호환성을 위한 javax.annotation.Generated 해결 방법
        // 참조: https://github.com/grpc/grpc-java/issues/3633
        compileOnly 'org.apache.tomcat:annotations-api:6.0.53'
        annotationProcessor "jakarta.annotation:jakarta.annotation-api"
    }
}

// Protocol Buffers (protobuf) 플러그인 설정
protobuf {
    protoc {
        artifact = "com.google.protobuf:protoc:${protobufVersion}"
    }
    generatedFilesBaseDir = "$projectDir/build/generated"
    plugins {
        grpc {
            artifact = "io.grpc:protoc-gen-grpc-java:${grpcVersion}"
        }
    }
    generateProtoTasks {
        all()*.plugins {
            grpc {}
        }
    }
}

idea {
    module {
        // IntelliJ IDEA에서 소스 디렉토리로 인식할 경로 설정
        sourceDirs += file('build/generated/main/java')
        sourceDirs += file('build/generated/main/grpc')
        generatedSourceDirs += file('build/generated/main/java')
        generatedSourceDirs += file('build/generated/main/grpc')
    }
}

tasks.named('test') {
    useJUnitPlatform()
}
3-2. gRPC 설정(클라이언트)
이 프로젝트를 gRPC 클라이언트로 사용하기 위한 설정을 해준다. 모든 API 요청에 대해서 인가 책임을 gRPC 서버로 보낼 것이므로, 일단 gRPC 클라이언트로서 서버에 요청하는 설정부터 진행해 보았다.
1) .proto 파일 생성(서버와 동일) 및 컴파일하여 Java코드 생성하는 것을 잊지 말자!
2) gRPC Client에서 gRPC 서버로 요청 시 사용하는 stub Class 추가
gRPC 서버에서 사용했던 것과 마찬가지로, .proto 파일 컴파일 후 생성된 AuthServiceGrpc 클래스를 통해 stub을 생성하고 설정하면, 설정된 gRPC 서버로 요청을 보낼 수 있다.
@Component
public class AuthGrpcClient {

    @GrpcClient("grpc-auth") // 환경파일에서 설정한 gRPC 서버명
    private AuthServiceGrpc.AuthServiceBlockingStub stub;

    public ValidateTokenResponse validateToken(String accessToken) {
    	ValidateTokenRequest validateRequest = ValidateTokenRequest.newBuilder().setAccessToken(accessToken).build();
        try {
        	return stub.validateToken(validateRequest);
        } catch (StatusRuntimeException e) {
        	throw new JwtAuthenticationException(e.getLocalizedMessage());
        }
    }
}
3) application.yml client 관련 설정 추가
연결할 gRPC서버 주소 및 keep-alive 설정, 주고받을 데이터의 보안 설정을 할 수 있다.
grpc:
  client:
    keumbang-auth:
      address: static://127.0.0.1:50051 # gRPC 서버 주소
      enableKeepAlive: true
      keepAliveWithoutCalls: true
      negotiationType: plaintext # 암호화 되지 않는 설정. 운영 환경에서는 TLS를 사용하여 보안 통신을 설정해야 함
4) (옵션) Interceptor 로깅을 위한 Config 파일 및 Interceptor 추가
gRPC 서버 때와 마찬가지로, 통신에 대한 로깅을 하기 위해 gRPC에서 제공하는 ClientInterceptor 인터페이스를 사용해서 Interceptor를 추가했다.
 @Configuration
 public class ClientConfig {
 	@GrpcGlobalClientInterceptor LoggingInterceptor loggingInterceptor() {
    	return new LoggingInterceptor();
    }
}
로깅 부분을 살펴보면 요청 메시지, 응답 메시지, 응답 상태를 로깅하도록 했다. 그런데 이때 onMessage 메서드에서 message 인스턴스를 다루는 것이 살짝 까다로웠다. 처음에는 message 객체에서 바로 toString() 메서드를 호출했으나, 이스케이프 된 UTF-8 시퀀스로 출력되어 한글이 깨졌고, 필드 값을 추출하여 String으로 바꿔주는 과정을 추가했다.
@Slf4j
public class LoggingInterceptor implements ClientInterceptor {

    @Override
    public <ReqT, RespT> ClientCall<ReqT, RespT> interceptCall(MethodDescriptor<ReqT, RespT> method, CallOptions callOptions, Channel next) {
        logMessage("Received call to", method.getFullMethodName());
        return new ForwardingClientCall.SimpleForwardingClientCall<>(next.newCall(method, callOptions)) {

            @Override
            public void sendMessage(ReqT message) {
                // 요청 메시지 로깅
                logMessage("Request message", extractMessageFields(message));
                super.sendMessage(message);
            }

            @Override
            public void start(Listener<RespT> responseListener, Metadata headers) {
                super.start(
                        new ForwardingClientCallListener.SimpleForwardingClientCallListener<RespT>(responseListener) {

                            @Override
                            public void onMessage(RespT message) {
                                // 응답 메시지 로깅
                                logMessage("Response message", extractMessageFields(message));
                                super.onMessage(message);
                            }

                            @Override
                            public void onHeaders(Metadata headers) {
                                logMessage("Response headers", headers.toString());
                                super.onHeaders(headers);
                            }

                            @Override
                            public void onClose(Status status, Metadata trailers) {
                                // 응답 상태 로깅
                                logMessage("Response status", status.toString());
                                if (!status.isOk()) {   // 에러 상태인 경우에만 trailers 로깅
                                    logMessage("Response trailers", trailers.toString());
                                }
                                super.onClose(status, trailers);
                            }
                        }, headers);
            }
        };

    }

    // 메시지의 필드 값을 추출하는 메서드
    private <T> String extractMessageFields(T message) {
        if (message instanceof com.google.protobuf.Message protoMessage) {
            // Protocol Buffers 메시지인 경우, 메시지의 필드를 직접 추출하여 반환해야 함
            // 프로토 버퍼 message 객체를 문자열로 반환하면 이스케이프된 UTF-8 시퀀스로 출력됨
            return extractFieldsFromProto(protoMessage);
        }
        return message.toString(); // 기본적으로 문자열로 변환
    }

    // 프로토콜 버퍼 메시지에서 모든 필드를 추출하는 메서드
    private String extractFieldsFromProto(com.google.protobuf.Message message) {
        StringBuilder sb = new StringBuilder();
        message.getAllFields().forEach((fieldDescriptor, value) -> {
            sb.append(fieldDescriptor.getName()).append(": ").append(value.toString()).append("\t");
        });
        return sb.toString();
    }

    private void logMessage(String title, String message) {
        log.info("{} [{}]", title, message);
    }
}
3-3. 테스트용 REST API 구현 및 Filter 설정
자원 서버로 들어오는 API 요청은 모두 인증 서버로 인가 역할을 위임한다. 이제 자원 서버에서 test API를 만들고, Spring Security에서 매 요청마다 GrpcClient를 사용해서 인가요청을 보낼 Filter 설정을 추가한다.
@GetMapping("/test)
public String test() {
    return "ok";
}
Spring Security Filter에서 stub으로 등록했던 AuthGrpcClient 객체를 주입받고, '토큰 유효성 검증' 부분에서 해당 객체의 validateToken() 메서드를 호출하고 응답받는다.
@Slf4j
@Component
@RequiredArgsConstructor
public class JwtFilter extends OncePerRequestFilter {
private final AuthGrpcClient authGrpcClient;
@Override
protected void doFilterInternal(HttpServletRequest request, HttpServletResponse response, FilterChain filterChain) throws ServletException, IOException {
// 허용된 URL인 경우, 필터 체인을 그대로 진행
if (isPermittedUrl(request.getServletPath())) {
filterChain.doFilter(request, response);
return;
}
String authorization = request.getHeader("Authorization");
try {
// Authorization 헤더 검증
if (authorization == null || !authorization.startsWith("Bearer ")) {
throw new JwtAuthenticationException(ErrorCode.AUTHORIZATION_HEADER_MISSING);
}
//Bearer 부분 제거 후 순수 토큰만 획득
String accessToken = authorization.split(" ")[1];
//토큰 유효성 검증
ValidateTokenResponse validateTokenResponse = authGrpcClient.validateToken(accessToken);
if (!validateTokenResponse.getIsValid()) {
throw new JwtAuthenticationException(ErrorCode.valueOf(validateTokenResponse.getErrorCode()));
}
//세션에 사용자 등록
CustomUserDetails userDetails = new CustomUserDetails(validateTokenResponse.getUserId(), validateTokenResponse.getAccount());
//스프링 시큐리티 인증 토큰 생성
UsernamePasswordAuthenticationToken authentication = new UsernamePasswordAuthenticationToken(userDetails, null, userDetails.getAuthorities());
SecurityContextHolder.getContext().setAuthentication(authentication);
filterChain.doFilter(request, response);
} catch (JwtAuthenticationException e) {
handleException(request, response, e, filterChain);
} catch (Exception e) {
handleException(request, response, new JwtAuthenticationException(ErrorCode.INTERNAL_SERVER_ERROR, e), filterChain);
}
}
private void handleException(HttpServletRequest request, HttpServletResponse response, JwtAuthenticationException e, FilterChain filterChain) throws IOException, ServletException {
request.setAttribute("exception", e);
filterChain.doFilter(request, response);
}
private boolean isPermittedUrl(String requestPath) {
// PERMIT_URL_ARRAY에서 허용된 URL 경로를 확인
for (String url : PERMIT_URL_ARRAY) {
if (requestPath.startsWith(url.replace("/**", ""))) {
return true;
}
}
return false;
}
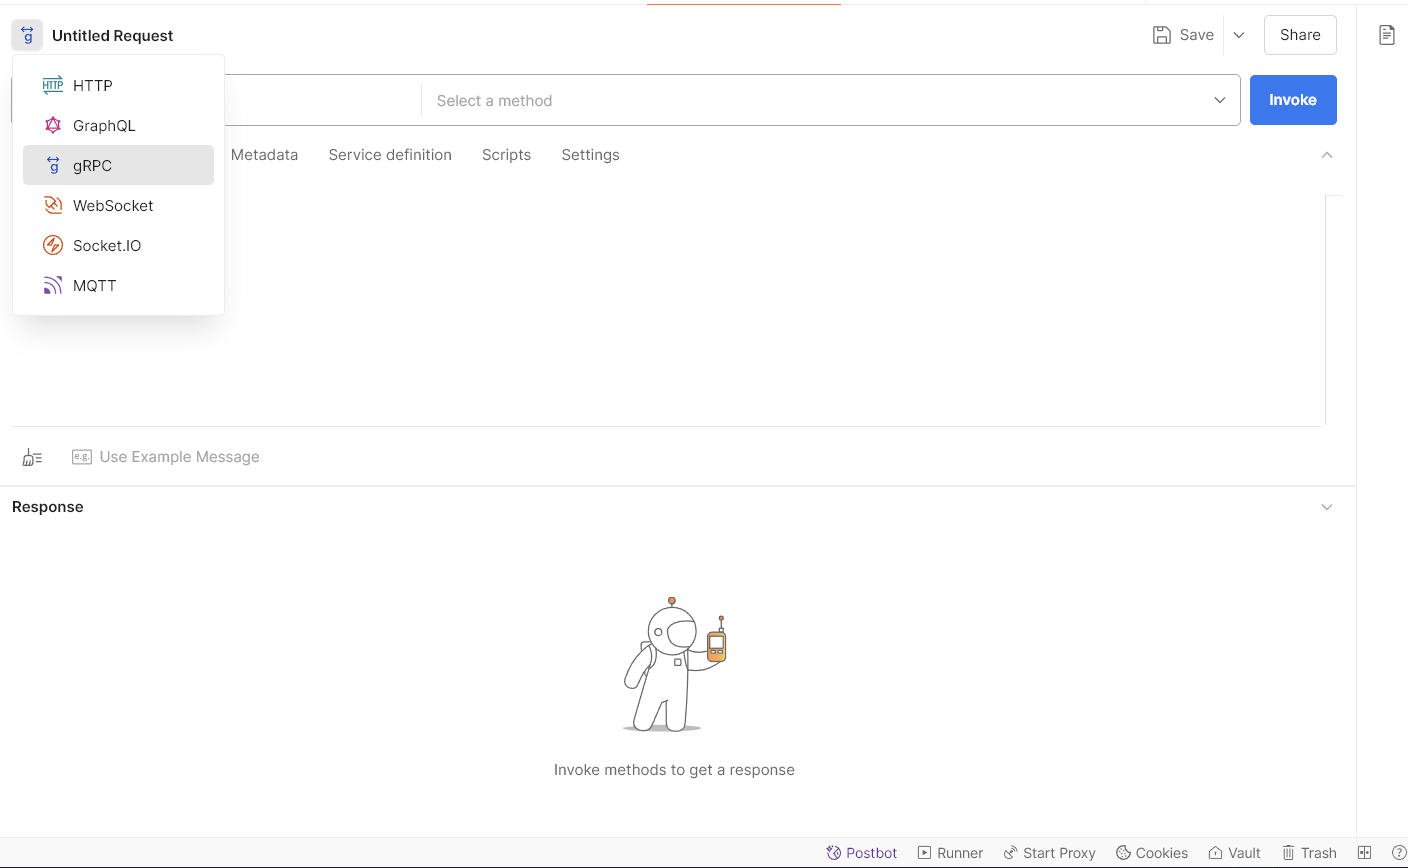
}4. Postman을 통한 gRPC 테스트
Postman은 HTTP 요청과 gRPC 요청 둘 다 테스트할 수 있다.
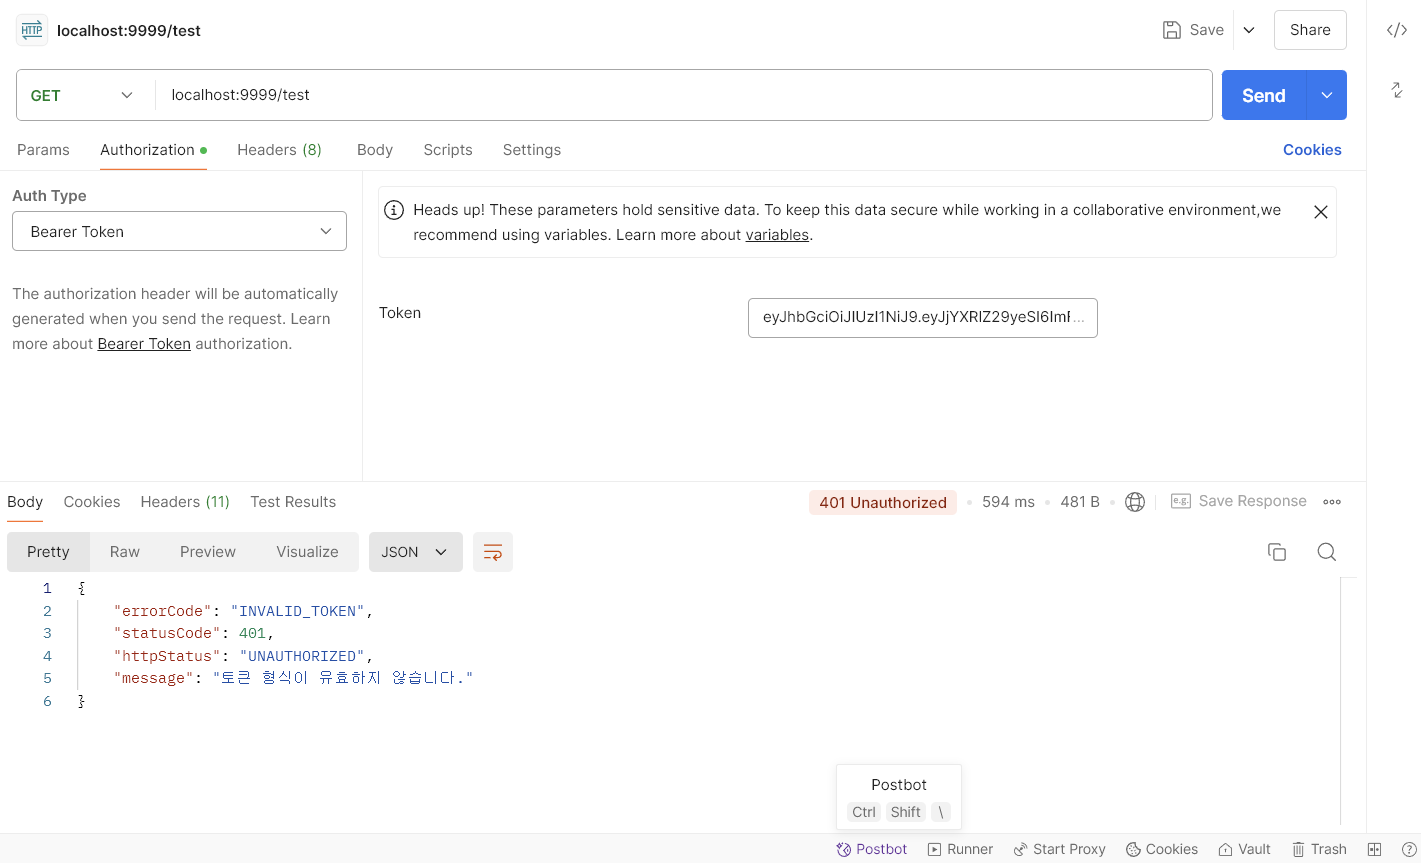
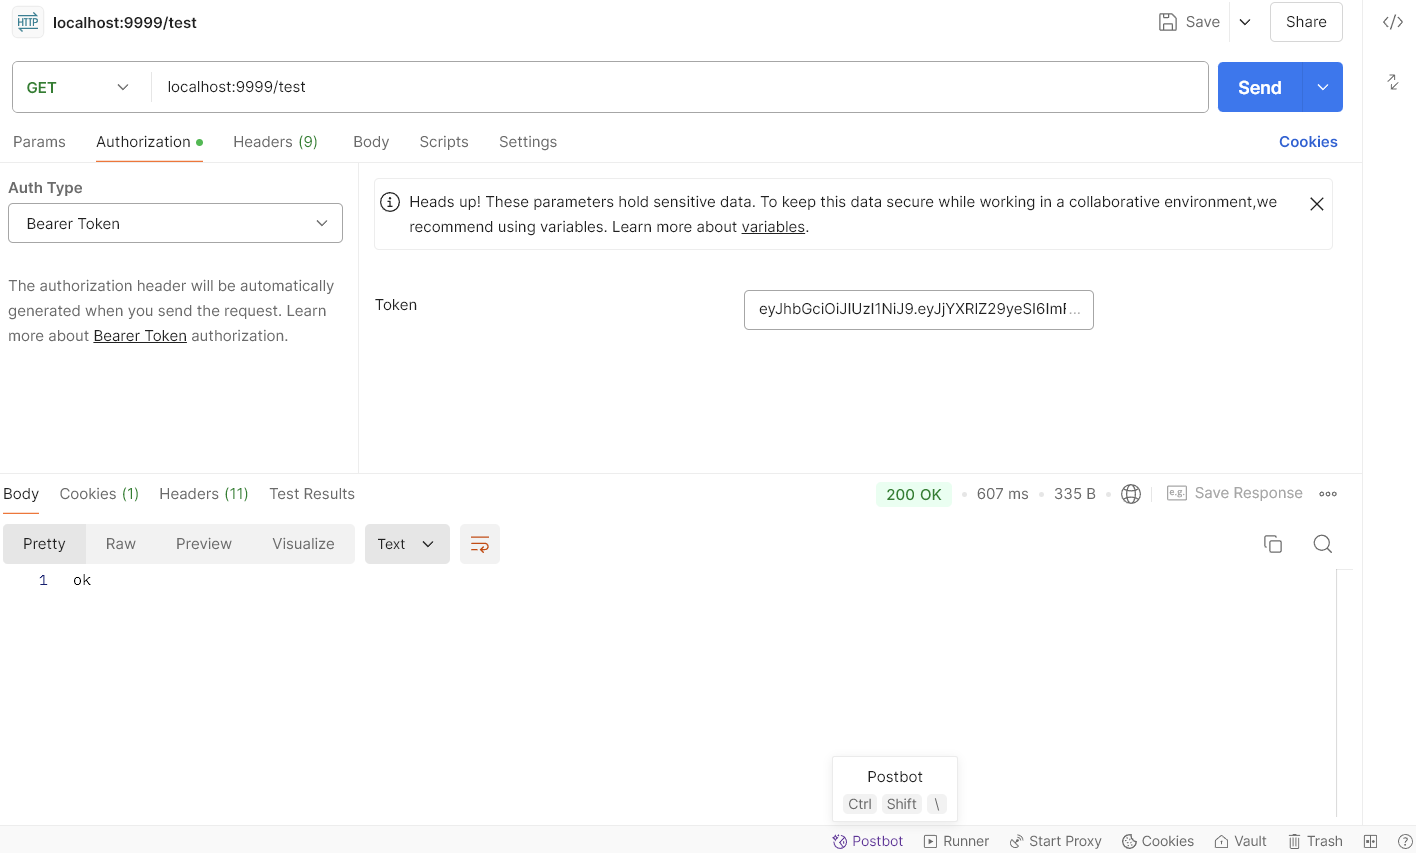
4-1. HTTP 요청 테스트 (Spring 자원 서버로 요청)
JWT 필터에서 Authorization 헤더에 accessToken 값을 받도록 했기 때문에 각각 유효하지 않은 토큰과 유효한 토큰으로 요청을 보냈다. 클라이언트가 받는 응답은 자원서버에서 설정한 응답인 것을 확인할 수 있다.
인터셉터를 통한 로깅은 아래와 같이 출력되는 것을 확인할 수 있다.


4-2. gRPC 요청 테스트 (Spring 인증 서버로 요청)
Postman에서 gRPC 서버가 제대로 동작 중이라면 아래와 같이 자동으로 유효한 엔드포인트를 찾는다.
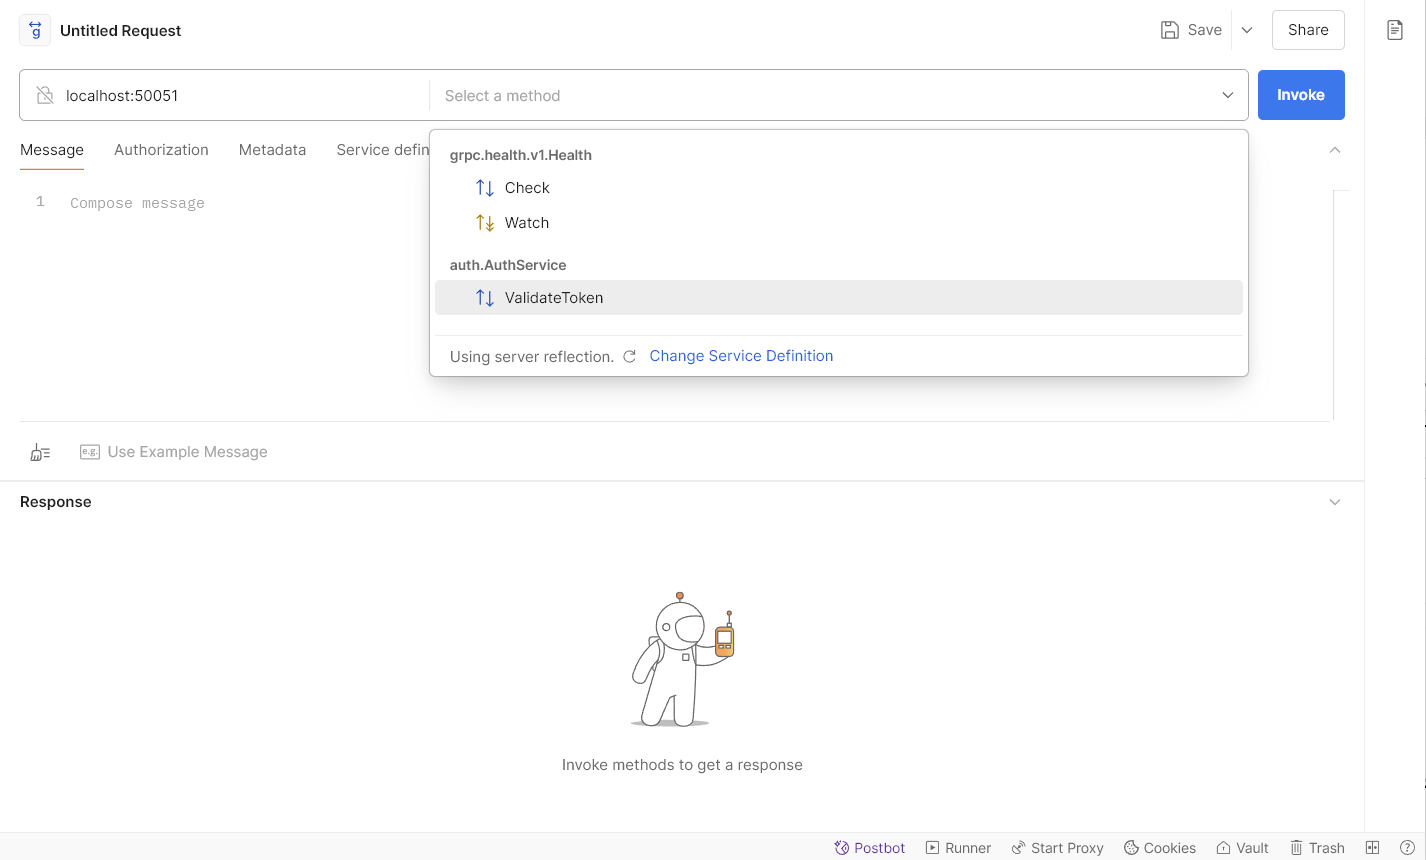
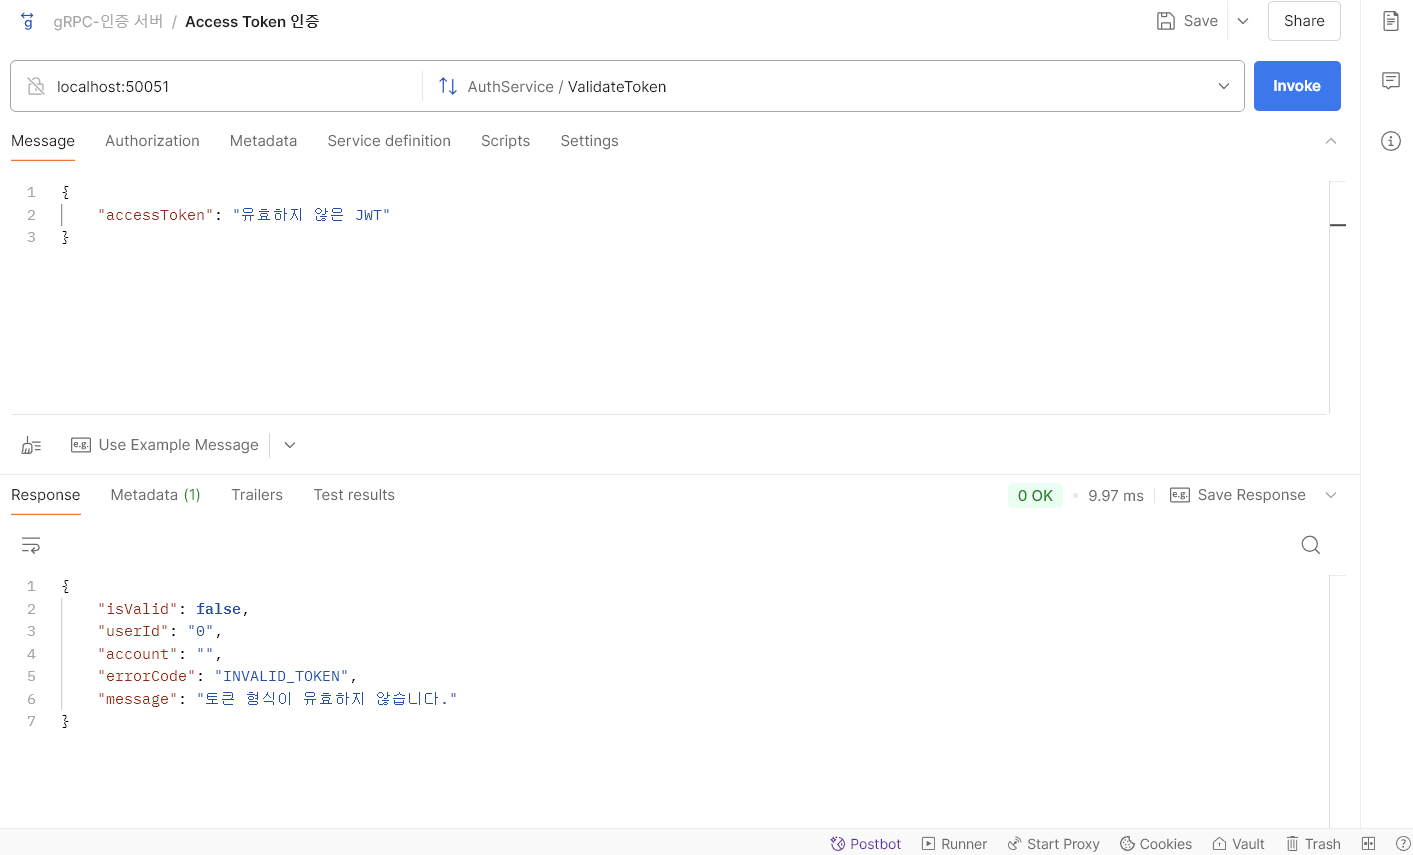
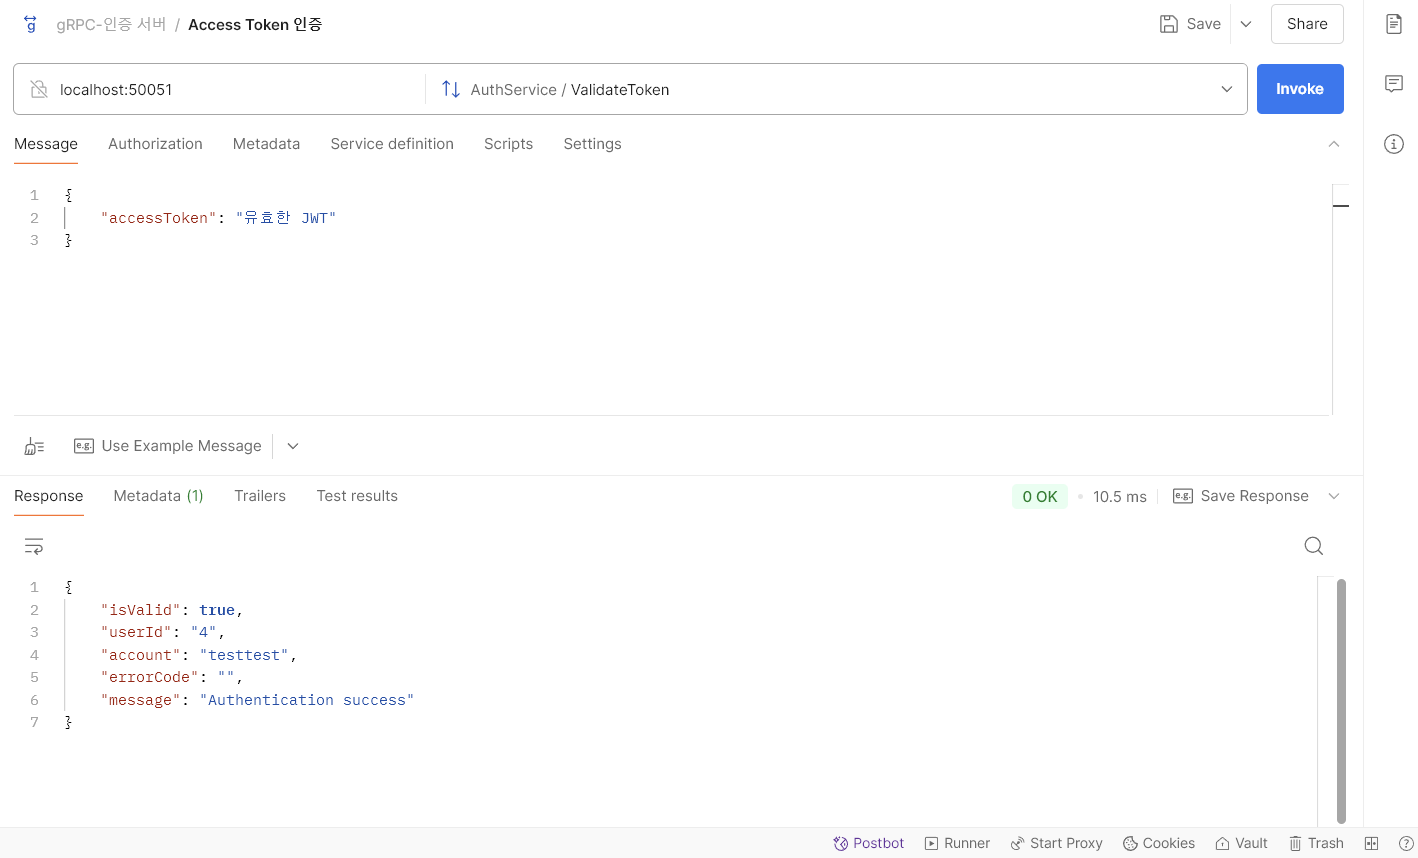
인증 서버에서 설정한 응답 형식으로 응답하는 것을 볼 수 있다.
'Spring' 카테고리의 다른 글
| Spring의 DispatcherSevlet은 무슨 일을 할까? (1) | 2024.11.05 |
|---|---|
| Spring IoC(Inversion of Control, 제어의 역전)와 DI(Dependency Injection) (0) | 2024.10.30 |
| Spring Boot 프로젝트 시작 시 Group Id, Artifact Id는 어떻게 설정할까?😯 (0) | 2024.09.21 |
| RedisTemplate 객체 주입 문제 해결하기 (0) | 2024.09.12 |

댓글